Gathering Your Dried Botanicals for Candle Decor
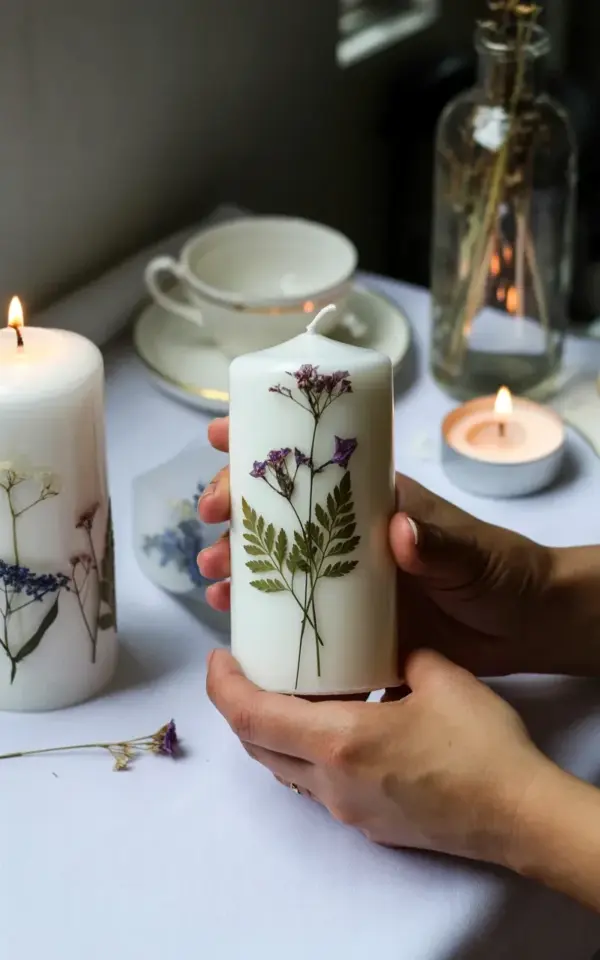
There is something deeply calming about making pressed flower candles on a quiet afternoon. I first tried it after spotting a similar photo online: a close up of hands working on a white pillar candle, with soft pink and purple petals pressed into the wax, and a teacup and glass bottle with dried stems in the background. That image felt like a direct invitation to hygge, so I gathered my own dried blooms and got to work. For this project you will want a mix of small pressed flowers (like violas, lavender buds, or baby’s breath) and flat green leaves such as ferns or tiny ivy. I dried mine between heavy books for about a week, though you can also use store bought dried botanicals.
I found that pressing flowers myself gave me more control over color and shape. Purple and pink petals catch the light gently, just like in that cozy scene. Keep your pressed botanicals in a dry, dark place until you are ready to craft.
Choosing the Right Candle Base: Why White Pillar Candles Work Best
White pillar candles are the perfect canvas for pressed flower decorating. Their smooth surface lets you see every detail of the dried blooms, and the neutral background makes pink, purple, and green pop without competing. I used a standard 3×4 inch white pillar for my first attempt, and it worked beautifully. Avoid textured or colored candles because the flowers can get lost against busy patterns.
Also check that your candle is made from paraffin or a blend that softens evenly under heat. Soy candles can be trickier because their softer wax may not hold the flowers as securely. The lit white tea candle in the background of that photo reminds me to always test a small patch first. When you are ready to embed, you will want the candle surface slightly warm, not too soft.
How to Press and Prepare Flowers for Candle Crafting
If you are pressing your own flowers, start with fresh blossoms that have no blemishes. Place them between two sheets of parchment paper inside a thick book, then stack more books on top. Leave them for 5-7 days. I learned the hard way that impatient pressing leads to wilted petals that crumble during application. For the photo look, I used dried violas (purple and pink) and small fern fronds. Greenery like flat parsley or tiny mint leaves also works well.
- Choose flowers with thin petals – thick ones like roses need to be pressed longer.
- Keep pressed botanicals in a sealed envelope away from humidity.
- Trim any thick stems or centers so the flower lies completely flat.
- Use tweezers to handle delicate pieces without crushing them.
Prep is half the battle. Once your botanicals are flat and dry, you can move on to the fun part: actually embedding them into the candle.
Step by Step: Embedding Pressed Flowers into Wax
Start by gently warming the candle surface. I used a handheld hairdryer on low heat, held about six inches away, and moved it in circles. Do not melt the wax; you just want it slightly tacky. Then pick up a pressed flower with tweezers and lay it on the warm area. Press it down with the back of a spoon or a clean finger. The wax will cool quickly and hold the flower in place. Work in small sections so the wax doesn’t harden too fast.
For the photo that inspired me, the hand in the foreground is holding a white candle with purple and pink flowers arranged in a loose cluster, with green foliage placed around them. I copied that layout by starting with larger leaves as a base and layering smaller flowers on top. If a petal lifts after cooling, just rewarm that spot lightly and press again. Patience makes the difference between a messy project and one that looks like a shop bought gift.
Creating the Cozy Hygge Scene: Teacup, Tea Light, and Dried Stems
Part of the charm of pressed flower candles is the entire setting. In the background of that picture, a white teacup and saucer sit beside a lit white tea candle, and a clear glass bottle holds dried stems. I love to style my workspace this way because it makes the process feel intentional. The teacup is not just decoration; I use it to hold my tweezers and small scissors. The glass bottle with dried lavender or eucalyptus adds texture and a faint scent.
Place your completed pressed flower candle on a white tablecloth or a wooden tray. Light a separate tea candle nearby to bring warmth to the scene. Do not light the decorated candle itself until you are sure the flowers are fully sealed – some crafters brush a thin layer of clear wax over the design to protect it. I skip that step and just keep my candle for display or short burns only. The soft glow through the petals is worth preserving.
Troubleshooting Tips for Perfect Pressed Flower Candles
My first few attempts ended with wrinkled petals and air bubbles. Here is what actually worked: always warm the candle evenly, never focus on one spot too long. If the wax gets too soft, the flowers sink in too deep. If it is too cold, they won’t stick. Room temperature is ideal. Another trick is to brush a very thin layer of melted paraffin on top of the flowers after they are placed – this seals them and prevents edges from curling up when the candle burns.
If you are gifting your pressed flower candles, wrap them in tissue paper and store them flat. Do not stack other items on top. The teacup and glass bottle in the photo remind me that presentation matters – a simple ribbon around the candle or a handwritten tag adds a thoughtful touch without overdoing it.
Gift Giving and Wrapping Your Handmade Candle Decor
Pressed flower candles make wonderful handmade gifts for birthdays, housewarmings, or just because. I package mine in a small muslin bag or nestle them in shredded kraft paper inside a cardboard box. The dried stems in a glass bottle can be a coordinating gift too – just tie them with a string and attach a note. Because the flowers are delicate, remind the recipient that the candle is best used for decoration or short, supervised burns. The soft pink and purple petals look especially pretty when placed near a window where the sun hits the wax.
This project does not require many supplies, but the result feels luxurious. I keep one on my nightstand next to that white teacup, and every time I see it, I remember the quiet afternoon of dipping petals into warm wax. It is a small ritual that brings a lot of comfort.
If you try making your own pressed flower candles, I would love to hear what combinations you come up with. Dried ferns paired with tiny blue forget me nots? Or maybe all white petals for a minimalist look. Grab a teacup, put on some music, and let the craft unfold. Your cozy corner is waiting.
#PressedFlowerCandles #DIYCandles #DriedFlowers #CozyHome #CandleCraft
This post was researched and drafted with AI assistance, then personally reviewed and edited by Diana before publishing.
Leave a Comment