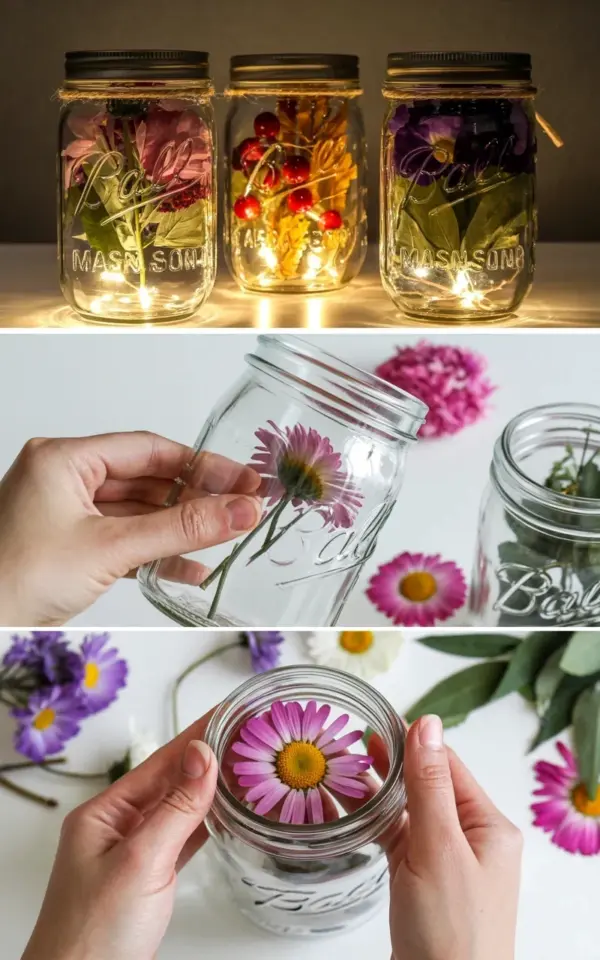
I remember the first time I tried this DIY mason jar lantern tutorial on a sticky July evening. I had a pile of thrifted jars, some dried petals from an old bouquet, and absolutely zero craft skills. But within an hour, I had three glowing lanterns on my patio table, and they looked exactly like the kind of thing you would buy at a trendy home goods store. The best part? This **DIYMasonJarLantern** project costs almost nothing and takes less time than deciding what to watch on Netflix. If you want a quick summer craft that actually delivers, pressed flower jars are where it is at this season.
Why Pressed Flower Mason Jars Work So Well for Summer
Summer evenings call for soft light, fresh air, and a little bit of handmade charm. Pressed flower mason jars check all three boxes without requiring a trip to the craft store for expensive supplies. The dried botanicals catch the candlelight in a way that fresh flowers cannot, creating a stained glass effect that shifts as the flame flickers.
This trend is having a real moment right now. People are moving away from plastic decor and looking for ways to reuse what they already have. Mason jars are everywhere, and pressing flowers is one of those skills that feels fancy but is actually ridiculously easy. Plus, the warm glow through dried petals and berries gives your outdoor space a cozy, romantic vibe that string lights just cannot replicate.
What You Need for This Pressed Flower Craft
Before you start gathering supplies, check your kitchen recycling bin. You probably already have the main ingredient. Here is what you will need for this simple project.
- Clean mason jars (any size works, but wide mouth jars are easier to arrange)
- Pressed and dried flowers, petals, berries, and small leaves
- Natural twine or jute string
- Scissors
- Tweezers (helpful for placing delicate petals)
- Tea lights or small LED candles
- Optional: Mod Podge or a thin craft glue if you want to tack flowers to the glass
I used standard pint sized jars for my set, but you can use anything from tiny jelly jars to big pasta sauce jars. The three jars in the photo show how different sizes and flower combinations create their own personality. The left jar with pink and purple flowers feels soft and romantic, while the middle jar with red berries and yellow orange foliage reads more bold and autumnal.
How to Press and Prepare Your Botanicals
If you have never pressed flowers before, you are in for a treat. It is one of the most satisfying parts of this pressed flower craft. Pick fresh blooms in the morning after the dew has dried. Flowers with flat petals work best, think daisies, pansies, cosmos, or small roses pulled apart into individual petals.
Place your flowers between two sheets of parchment paper inside a heavy book. Stack more books on top, or use a dedicated flower press if you have one. Wait three to five days and you will have perfectly flattened botanicals ready for your mason jar ideas.
For the berries in the middle jar, I used dried red winterberries that I had saved from a holiday arrangement. You can also buy premixed dried botanicals at craft stores if you want to skip the pressing step entirely. Just make sure everything is completely dry. Any moisture left in the flowers will fog up the glass once the candle is lit.
Arranging Your Dried Botanicals Inside the Jar
This part is where the magic happens. You can arrange your dried botanicals mason jar style in two ways. You can let the flowers float loosely inside the jar, or you can glue them directly to the inner glass for a more structured look. I prefer the loose method because it lets you shake things up later.
Start with your tallest elements. Green stems or longer leaves go in first, leaning against the sides of the jar. Then add your focal flowers. In the left jar of the tutorial photo, pink petals and purple blooms sit low while green stems reach upward. The middle jar uses red berries clustered near the bottom with yellow orange foliage fanning out above them. The right jar keeps things simpler with purple flowers and green stems that stay close together.
Use tweezers for precision and patience. Some petals are fragile and will crumble if you handle them too much. If you want the flowers to stay in place, dab a tiny bit of glue on the glass and press the petal gently until it sticks. Let the glue dry completely before adding a candle.
Adding Twine and Finishing Touches
The twine wrapped around the neck of the jar is not just decorative. It hides the rim and gives your hand a textured spot to hold when the glass gets warm from the candle. Wrap natural twine around the neck of each jar two or three times, then tie a small knot on the side.
You can leave the ends short and neat, or let them hang loose for a more rustic look. Some people like to add a tiny sprig of dried lavender tucked under the twine. Others thread a small tag with the date or a handwritten word. That part is totally up to you.
The three jars in the tutorial image show how consistent twine wrapping creates a cohesive set, even when the flower combinations are different. Keep your knots in the same spot on each jar for a clean, intentional look. If you are making these as gifts, matching twine color across all jars makes the set feel polished.
Lighting and Displaying Your Mason Jar Lanterns
Now comes the rewarding part. Drop a tea light into each jar and watch the pressed flowers come alive. The light passes through the dried petals differently depending on their thickness and color. Pink and purple flowers cast a soft rosy glow. Red berries and yellow orange foliage create a warmer, amber tone. Purple blooms with green stems give a cooler, more subdued light.
Place your lanterns on a flat, stable surface away from anything flammable. If you are using real candles, never leave them unattended. LED tea lights are a safer option for tabletops and work just as well for the visual effect.
These jars look beautiful clustered together on a picnic table, lined up along a porch railing, or hung from a shepherd hook using wire handles. The warm glow through the glass makes any summer evening feel special, even if you are just sitting in your own backyard with a glass of lemonade.
More Summer Craft Ideas Using Mason Jars
Once you finish this tutorial, you will probably have leftover pressed flowers and a new obsession with mason jar ideas. Here are a few other ways to use your supplies this season.
Turn a larger jar into a pressed flower vase by gluing petals to the outside instead of the inside. Fill it with fresh cut flowers from the garden for a layered look. You can also make smaller versions using baby food jars and give them as party favors at a summer gathering.
Another idea is to layer different colored sand or salt in the bottom of the jar before adding your dried botanicals. This adds weight and stability while creating a beachy, coastal vibe. Use blue sand for a sea glass effect, or white sand mixed with tiny shells for a nautical feel.
The same pressed flower and twine technique works on glass bottles, candle holders, and even old lightbulbs. Once you understand the basic method, you can adapt it to almost any clear glass container you find at a thrift store.
This is truly one of the easiest summer crafts you can make in under an hour. The materials are cheap, the process is forgiving, and the result looks like something you would pay thirty dollars for at a boutique. Grab a jar, dig out those dried petals, and see what happens. You might end up with a new porch decoration that stays up all year long.
#DIYMasonJarLantern #PressedFlowerCraft #SummerCrafts #MasonJarIdeas #EasyDIY
This post was researched and drafted with AI assistance, then personally reviewed and edited by Diana before publishing.
Leave a Comment