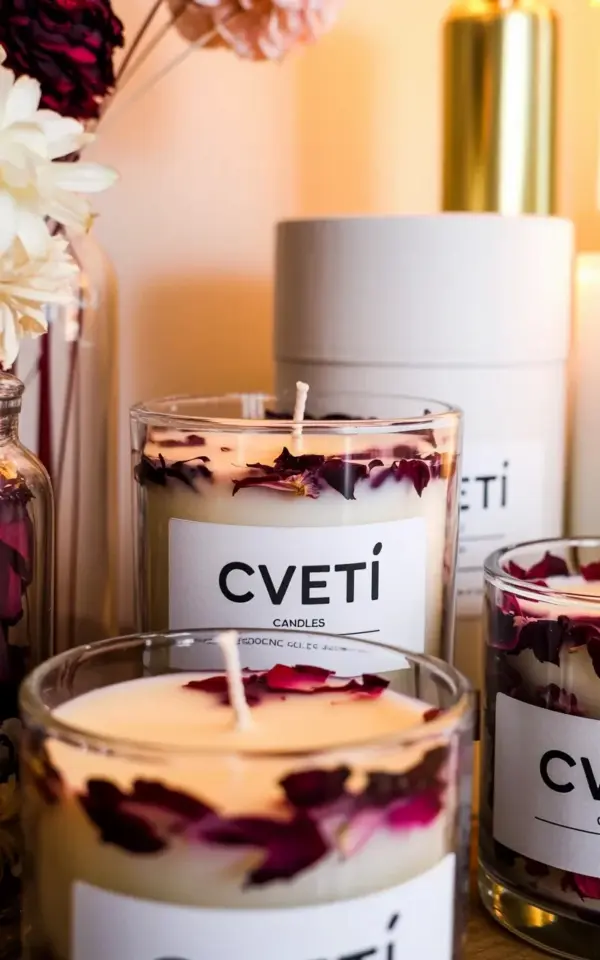
I still remember the first time I saw a dried flower candle that looked like a tiny garden frozen in wax. It was a close-up shot on Pinterest: a white candle with a crisp black label reading CVETI, deep burgundy and pink petals layered right into the surface. Honestly, I thought it must cost fifty bucks. Turns out, making your own dried flower candles at home is way easier than you expect. And cheaper. Way cheaper. That image stuck with me, and after a few messy tries (one ended up looking like a sad salad), I figured out enough to share with you. So here’s a roundup of ideas, each with a different personality, to get you started.
Why Dried Flower Candles Make the Perfect Handmade Gift
Look, buying gifts is fine, but making one says something else entirely. A dried flower candle is personal. It’s pretty. And it smells like whatever you want it to smell like. I gave one to my aunt last Christmas, and she kept it on her coffee table for months before she even lit it. That’s the real win. You don’t need to be a craft wizard either. Melt some soy wax, drop in a few dried petals, pour, cool, done. The whole process takes maybe an afternoon. Wrap it in brown paper with a piece of twine and bam, you just made a handmade gift that looks thoughtful without breaking your budget. #handmadegifts
First Things First: The Right Wax for Floral Candles
Not all wax behaves the same. I learned that the hard way. Soy wax is my go-to for dried flower candles. Why? It melts at a lower temperature, so it doesn’t scorch the delicate petals. And it has a nice matte finish that makes the flowers pop. Paraffin works too, but it’s fussier. Here’s a quick list of what you’ll need:
- Soy wax flakes (I buy 5-pound blocks from a local craft store)
- Cotton or wooden wicks with a tab
- A heat-safe container – a simple glass jar or tin works great
- A double boiler or a makeshift one (metal bowl over a saucepan)
- Tweezers. Seriously. Don’t skip the tweezers.
- Dried flowers of your choice – more on that below
- Fragrance oil (optional, but vanilla or lavender pairs beautifully)
Oh, and a thermometer. Not strictly necessary, but trust me, guessing the temperature leads to melted petals floating in a sad grey soup. Not cute.
Three Dried Flower Candle Themes to Try This Weekend
Alright, here’s where it gets fun. Instead of giving you one generic tutorial, I’m sharing three distinct themes. Each one uses the same basic technique but changes the vibe completely. Pick one. Or do all three. Your call.
Theme One: The Burgundy Rose (Inspired by That Pinterest Photo)
That candle I saw? Deep burgundy and pink petals pressed into white wax with a simple label. Recreate it with dried rose petals, a few small buds, and a white cylindrical container. The trick here is layering. Pour a thin layer of wax, let it cool until it’s tacky, then use tweezers to place petals individually. Pour another thin layer on top. Repeat. You want some petals fully submerged and others peeking out. That’s what creates the expensive layered effect. In the background of that photo, there was a glass container with dried white and burgundy flowers – you could use that as a tea light holder. Just don’t light the tea light if it’s packed with dry petals near the flame. Safety first, you know?
Theme Two: Wildflower Field Candles
Not gonna lie, this is my favorite. Grab a mix of tiny dried flowers – baby’s breath, blue cornflowers, yellow yarrow. Pour a thick base of wax, then scatter the petals over the surface while the wax is still semi-solid. Press them in gently with a chopstick. The result looks like a little field trapped in candle form. Perfect for a rustic kitchen or a cottage vibe.
Theme Three: Herb Garden Scented Candles
Combine dried lavender buds, rosemary sprigs, and a few chamomile heads. Heat the wax, add lavender essential oil (or a lavender-vanilla blend), then pour. The herbs add texture and a subtle natural scent upgrade. I made a batch for a friend who claimed to hate flowery things, and she texted me two weeks later asking for the recipe. So there.
How to Keep Your Dried Flower Candles Looking Like a Pro Did Them
Here’s the thing. When you pour hot wax directly onto dried petals, they sometimes float up and disappear. Or they burn. Or they look like sad little specs hiding at the bottom. The solution? Temperature and timing. Let your wax cool to about 135°F before pouring. That’s warm enough to stay liquid but not hot enough to scorch. Use tweezers to place each petal exactly where you want it. Press them into the side of the container if you want them visible from the outside. And for the love of all things crafty, do not stir. Stirring turns petals into confetti soup. Also, if you want the label look from that photo – a simple “CVETI” label – buy blank adhesive labels and write on them with a fine-tip marker. Or print them. Either works.
Common Candlemaking Mistakes (and How to Fix Them)
I messed up a lot. One time I put a whole dried hydrangea bloom in the wax. It looked beautiful for about ten minutes. Then it caught fire. Tiny flame, no big deal, but the candle was ruined. So here’s a quick bullet list of what not to do:
- Don’t use fresh flowers – they’ll rot inside the wax. Dry them first (press them in a book for a week or use silica gel).
- Don’t place petals too close to the wick – they can become a fire hazard when the candle burns down.
- Don’t pour wax too hot – it will turn petals brown and brittle. Trust me, I cried over a batch of pink roses that turned the color of old tea.
- Don’t skip the second pour – after the candle cools, you’ll often get a sinkhole around the wick. Melt a tiny bit more wax and top it off.
Honestly, the biggest fix is patience. Let each layer set before adding the next. Rushing is the fastest way to a messy candle.
Choosing Colors and Flowers for Your Floral Candles
You want the contrast to be visible. White or cream wax makes dark petals pop. Deep burgundy, dried lavender, dried orange slices, even small green leaves. Stay away from powders or crushed herbs that’ll just sink. I’m personally obsessed with pairing dried marigold petals (bright orange) with pale yellow wax – it looks like a sunset in a jar. And if you want a monochromatic look, go for all white petals like dried baby’s breath and white wax. Simple, elegant, and impossible to mess up. #floralcandles
One weird thing I discovered: dried citrus slices look gorgeous but they’re tricky. They float. So I press them against the glass wall of the container with a wooden skewer while the wax sets. It works about 80% of the time. The other 20%? I just call it abstract art.
Wrapping It Up and Lighting It Up
Making dried flower candles at home is one of those projects that looks way more complicated than it actually is. You can produce something that feels boutique-bought for a fraction of the price. Plus, the process itself is calming. Melting wax, arranging petals, watching it cool – it’s almost meditative. I’d say give it a shot this weekend. Pick one theme, gather your supplies, and just go for it. Even if your first candle looks a little wonky, gift it anyway. People love the imperfection. It’s proof you made it yourself.
Got a favorite flower combo you want to try? Drop a comment below. I’m always looking for new ideas to steal.
#diycandles #driedflowercandles #floralcandles #candlemaking #handmadegifts
This post was researched and drafted with AI assistance, then personally reviewed and edited by Diana before publishing.
Leave a Comment