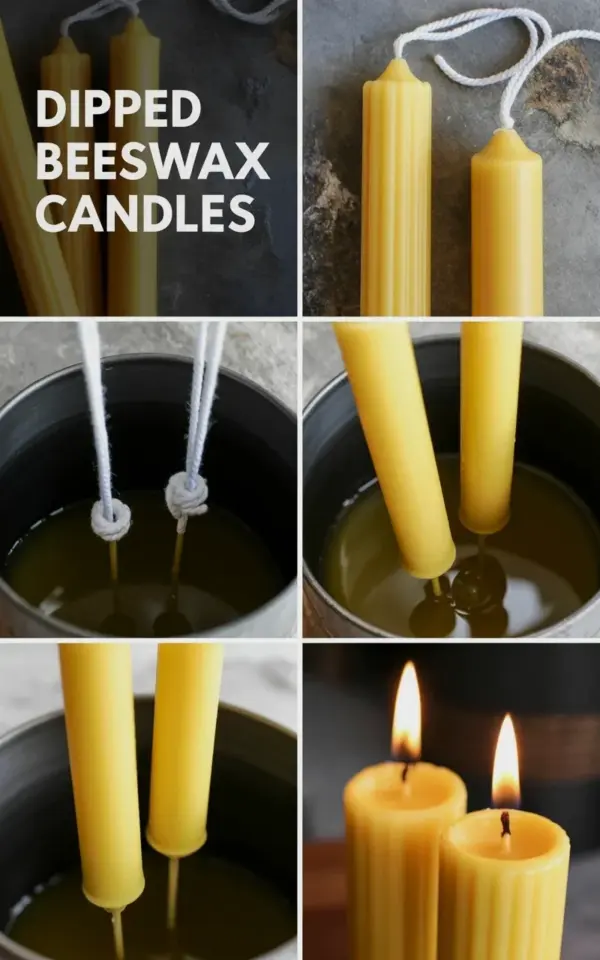
There is a particular kind of quiet that comes with dipping a wick into a pot of melted wax. It’s a slow, repetitive motion that feels almost meditative, and honestly, it is the perfect way to spend a rainy afternoon. Making dipped beeswax candles is a craft that looks way more complicated than it actually is, but there are a few sneaky hurdles that can trip you up. I’ve made my fair share of crooked, lumpy messes, so let me walk you through the process and the common mistakes to avoid, so your first batch comes out as pretty as that pale yellow finish in the tutorial photo.
Look, if you’ve ever admired those long, elegant taper candles in a home decor magazine, you can make those. The process is basic: dip a wick into hot wax, let it cool, and repeat until the candle reaches your desired thickness. That’s it. But the devil is in the details, like how you hang the wicks or the precise temperature of your wax pot. In the step-by-step photo, you can see the white string holders suspended over a dark container, which is a genius hack to keep your projects organized.
Choosing the Right Beeswax for Your Candle Making Setup
Not all beeswax is created equal, and this is where a lot of beginners stumble. You generally have two choices: pastilles (those little bead-like pellets) or a solid block. For dipping, I highly recommend the pastilles. They melt faster and more evenly, which means less scorching and a smoother final product. A solid block requires chopping, and let me tell you, trying to hack through a dense brick of wax with a kitchen knife is a recipe for a bad day.
The color of your wax matters too. The photo shows those gorgeous pale yellow beeswax finishes, which are typical of lighter, filtered wax. You can find unbleached wax that has a deeper, honey-toned amber color, but for that classic, soft look, stick with a lighter grade. Also, make sure you are getting 100% pure beeswax. Some cheaper options are blended with paraffin, and while they are cheaper, they don’t hold the scent or burn as cleanly. You want the real deal.
Setting Up Your Double Boiler: The Melting Mistake
Your wax pot is your lifeline, and you cannot just toss wax into a saucepan over direct heat. You absolutely need a double boiler setup. You can use a dedicated metal pitcher or a large tin can placed inside a pot of simmering water. The water does the heating, not the flame, so you get a gentle, even melt. Skipping this step is the fastest way to scorch your wax and potentially start a fire, which is a mood killer for sure.
Keep the water at a low simmer, not a rolling boil. Bubbles splashing up into your wax will add water, and trust me, water in hot wax is a dangerous spitting hazard. You want to heat the beeswax to around 160°F to 170°F for dipping. Here’s the thing: you don’t need a fancy thermometer, but it helps. If you don’t have one, you know it’s ready when the wax is fully liquid and thin like water, but not smoking. The melting point is around 145°F, so you have a little room to work with.
Preparing Your Wicks and Hanging the String Holders
The wicks look so simple in the grid photo, but they need a little TLC before they can take a dip. Cut your wicks longer than your desired candle length, and then attach a small weight to the bottom of each one. This weight, often a small washer, keeps the wick straight as it hangs down into the wax. Without it, your wick will curl up like a rebellious piece of string and ruin your candle. I’ve also seen folks use small hooks, which are visible in the top right image, to hang the candles.
Once your wicks are weighted, you need a way to suspend them. The “white string holders” in the photo are likely a simple cotton string tied across the top of your dipping container. Tie the top of the wick to this string, making sure it hangs perfectly straight and isn’t touching the bottom of the pot. It’s a system that looks a bit janky, but it works perfectly to keep everything organized.
The First Dip: Avoiding the “Snowball” Effect
This is the most critical step, and it’s the one mistake almost everyone makes. Your first dip must be quick and decisive. Lower the wick straight down into the hot wax, let it sit for literally one second, and pull it straight back up. If you leave the wick in the hot wax too long at the start, the heat causes the air in the wick to expand, pushing out tiny air bubbles that create a rough, brittle texture. This is famously called the “snowball” effect because it looks like little grains of snow are stuck to your wick.
When you pull the wick out, you’ll notice the wax has cooled into a thin, fragile shell around the string. That is your base. Do not panic when it looks a little wonky. The subsequent dips will smooth it out. Just let it hang there and dry completely, which usually takes about 30 to 60 seconds. Speed at this stage is less important than maintaining that straight, vertical entry and exit. Keep your motion fluid, like a swan diving into a lake, not like a yo-yo.
Mastering the Cooling Dip for Smooth Layers
Here’s the secret to a smooth candle: the wax should be just slightly cooler for the second and third dips. If the wax is too hot, it will remelt the base layers and cause drips. If it’s too cool, you’ll get a thick, clunky layer that looks like a homemade mess (which can be charming, but maybe not what you’re going for). For dipping, you want the liquid wax to be similar to warm syrup, just above the melting point, around 150°F to 155°F.
Each time you dip, dip a little deeper than the previous dip. This neat trick creates those beautiful, taper-style roots at the base of the candle. It adds mass and stability without looking clunky. You’ll also want to gently tap the bottom of the candle on the edge of the pot after each dip. This knocks off the excess wax that pools at the bottom, preventing a big, unsightly blob from forming. Between dips, allow enough time for the wax to cool and set; rushing this will result in ripples.
Time, Repetition, and the Patience Problem
Honestly, the hardest part is the waiting. You will need anywhere from 15 to 30 dips to get a candle that’s thick enough to burn well. It’s tempting to think “I’ll just do ten dips and call it good,” but a skinny candle burns fast and drips wax everywhere. The layers build slowly. You’ll see the transformation happen, it goes from that thin, wispy shell to a solid, strong pillar. It is deeply satisfying.
Here’s where you can test your patience even more. If your candle starts to look a little frosty or matte, that’s actually a good sign. It means the wax is building and creating that classic beeswax finish. The tutorial grid shows a middle right image of two pale yellow candles, and that purity of color only comes with consistent, slow dipping. Don’t try to speed up the process by dunking the candle in cold water. It will cause the layers to contract and crack, ruining all your hard work. Just let it hang and set naturally.
Snipping the Bottom and the Crooked Wick Problem
So, you’ve dipped for hours, and you have two beautiful candles. Now what? The bottom will have a bit of a lip or a jagged edge from the weight. Don’t try to cut it with scissors; you’ll crush the wax. Instead, use a sharp knife to gently trim the bottom until it’s flat, or just pull off the weight and smooth it with your fingers while it’s still slightly warm. It feels a bit like clay, so you can smooth out any imperfections easily.
The greatest heartbreak is finding out that your wick is completely crooked and off-center. This makes the candle burn unevenly and tunnel down one side. The cause is almost always a wick that wasn’t hanging straight before the first dip. A quick fix for the next batch is to make sure your weight is heavy enough and that the string holder is taut. Gravity is your friend, but only if you let it do its job.
Another thing, the hooks you see in the photo are great for hanging the candles during the drying process. If you leave them hanging and let the wax fully harden for a few hours, the wick will usually stay put. Once fully hardened, you can snip the wick down to about a quarter of an inch. Use a wick trimmer or small scissors; cutting it with a dull blade can fray the cotton and cause a mushroom shape when burning. It’s a small detail that makes a huge difference.
Finishing Up and Cleaning the Wax Splatter
Let’s be real, making candles is a messy hobby, and you’ll have a thin film of wax on everything by the time you’re done. The best way to clean up is to scrape off the bulk of the wax while it’s still solid, then use a paper towel dipped in mineral spirits or rubbing alcohol to wipe down the remaining residue. If you spill hot wax on your countertop, let it cool and then use a hairdryer to gently melt it before scraping with a plastic card. No need for harsh chemicals, just a little heat and patience.
Also, don’t throw away your leftover wax and wick ends. You can save the trimmings in a jar and melt them down later to make those cute little wax melts or to refill a tealight. It feels good to waste nothing. I keep a specific “candle junk” tin in my craft cupboard for exactly this purpose. It’s kind of like saving the leftover paint in a jar after a project; you never know when you’ll need it.
So there you have it, the whole messy, rewarding process, along with all the hiccups I’ve already experienced for you. I hope this helps you create some beautiful dipped beeswax candles without the trial and error. Grab some wax and try it yourself, and be prepared to become officially obsessed with the handmadelifestyle. If you give it a go, I’d love to hear about your results, good or bad. Happy dipping! 🕯️
This post was researched and drafted with AI assistance, then personally reviewed and edited by Diana before publishing.
Leave a Comment