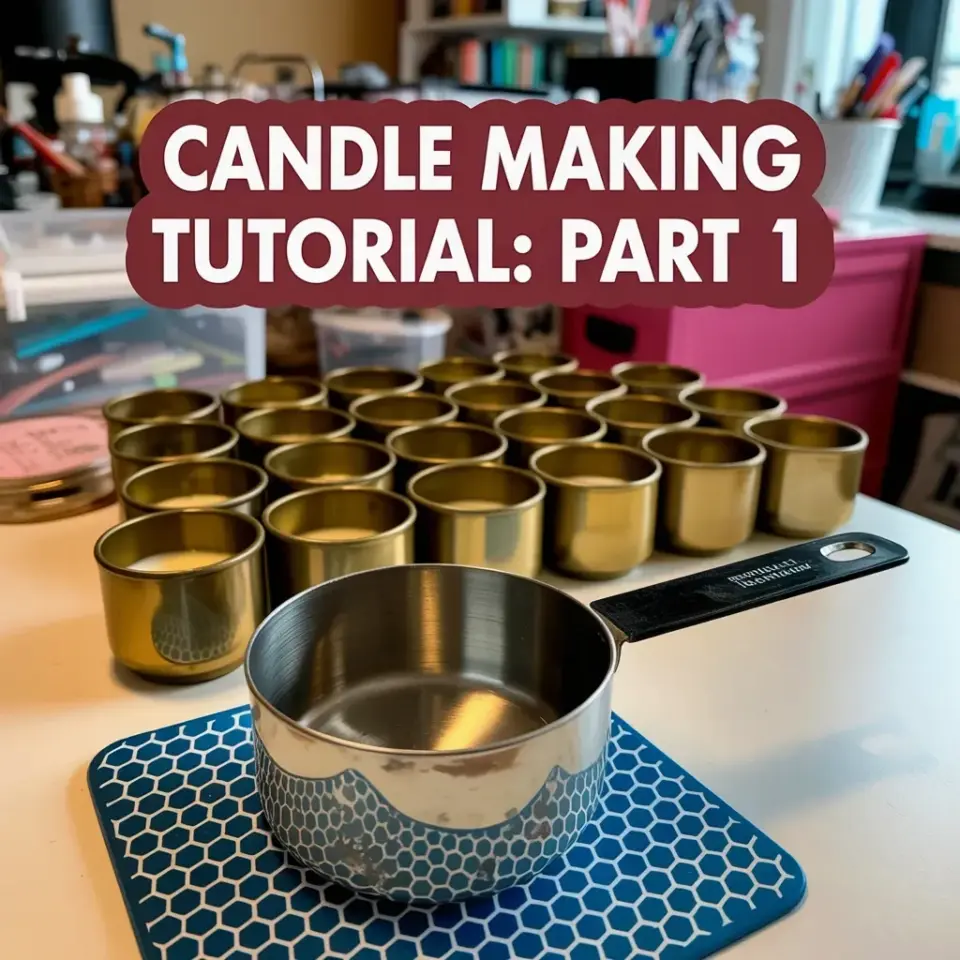
They are, without a doubt, the shiniest objects in my entire house right now. Fifteen little gold tins, lined up in two neat rows, just waiting to be filled with wax. This is the moment where every candle making session actually begins, not with the pouring or the scenting, but with the sheer logistics of getting your supplies together. and avoiding the dumb mistakes that will ruin your counters, your pour pot, or your entire batch. So this candle making tutorial part 1 is going to walk you through the exact setup you see in that photo on my white counter. We are talking about the gold tins, the melting pitcher, and the absolute necessity of that blue tile trivet.
The photo up top shows the truth of the matter: the supplies are the star of the show. It is an unglamorous moment, just a bunch of empty containers and a big silver cup sitting on a blue and white hexagon tile. But if you get this stage wrong, you will be scrubbing melted wax off your kitchen counters for a week. I am writing this guide as a common mistakes and how to fix them manual, because nobody needs a lecture on perfection. We need a checklist of what not to do, so we can get straight to the fun part.
## The Real Reason Your Counters Are in Danger (Not Having a Heatproof Surface)
Here’s the thing, I almost ruined my parents’ granite island top with a hot melting pitcher. I was cocky, I was in a hurry, and I thought the pitcher would cool down enough by the time I set it down. It didn’t. That is why you see that blue and white patterned trivet sitting squarely under the silver measuring cup in the photo. That little tile is the unsung hero of this whole operation.
You do not need a fancy, expensive melting setup. You just need something that can physically withstand high heat without transferring that heat to your countertop. A thick ceramic tile from a hardware store works perfectly. A cast iron trivet works even better. Even a stack of three or four thick cork pads can do the job in a pinch. Just make sure whatever you use is completely stable. You do not want your pour pot wobbling when you have two pounds of hot liquid wax in it. That is a disaster waiting to happen.
Take a hard look at your workspace before you even open your wax. Are you working on a wooden table? Is your counter made of a material that cracks under heat? If you answered yes to either of those, find a sacrificial surface or buy a trivet now. I promise you, the 10 minutes it takes to source a heatproof spot is nothing compared to the 10 hours you will spend trying to fix a burn mark.
## Choosing the Right Melting Pitcher (The Big Silver Cup)
In the photo, that silver metal measuring cup is huge. It has a sturdy black handle and a smooth, polished surface that looks like it just came out of the box. That is what you want for melting wax, specifically a dedicated stainless steel pour pot. Do not use a plastic measuring cup. Do not use a glass Pyrex jug that you love. If you overheat a glass jug just once, it will shatter into a million pieces and ruin your entire day.
Stainless steel is the gold standard for melting wax. It heats evenly, it cleans up relatively easily (more on that later), and it can take the temperature fluctuations without warping. When you look at the pitcher in the photo, take note of the spout. A deep, well-defined spout is crucial. You will be pouring this liquid into small tins, and if your pot has a weak spout, the wax will drip down the side and make a mess of your gold tins.
The black handle isn’t just there for looks either. It is heat resistant, which is incredibly important. Always assume the handle is hot, even if you just took the pot off the heat source. Use a thick oven mitt or a dry towel to grab it. I have a small scar on my wrist from a negligent moment in my early candle making days, and I promise you do not want that souvenir.
## The Truth About Those Gold Tins (You Need to Clean Them First)
Look at those 15 little gold beauties in the photo. They look perfect, don’t they? They are shiny and metallic and scream “luxury candle”. But they are not ready for wax yet. In my experience, metal tins come from the factory with a thin layer of dust, oil, or manufacturing residue on them. If you pour wax into them without a clean, you will get poor adhesion and maybe even little bubbles in your final candle.
I am not saying you need to scrub them with a harsh chemical. Just take a lint-free cloth with a little rubbing alcohol and wipe down the inside of each tin. It takes five minutes, but it gives the melted wax a clean surface to bond to. Skip this step and you might see your wax pulling away from the tin walls after a week. That is called “wet spotting”, and it makes your candle look like a frosty, second-hand mess even when it is brand new.
Also, check the edges of your tins. Sometimes they have sharp bits from the manufacturing process. Run your finger around the rim and make sure it is smooth. You are going to be touching these tins a lot, and there is nothing worse than slicing your finger on a rough metal edge while you are trying to pour your first batch.
## Melting the Wax Without Burning It (The Temperature Trap)
The silver pitcher in the photo is empty right now. That is exactly how you want it to be before you start. The most common mistake I see from beginner candle makers is getting impatient and cranking the heat too high. You are not boiling water. You are melting a delicate compound that will scorch and discolor if you rush it.
You should use a thermometer that attaches to the side of your pour pot. Do not guess. The difference between a perfectly scented candle and a burnt, smoky mess is about ten degrees. If a recipe calls for adding fragrance oil at 185°F, you need to wait for that exact moment. Adding it too hot will burn off the scent. Adding it too cool will prevent the oil from binding to the wax, and then you end up with a pool of oil sitting on top of your candle.
Low and slow is the motto here. If you are using a double boiler setup (a pot of water with your pour pot sitting on top), that is the safest way to go. The steam gently heats the pitcher without creating hot spots. Water is also forgiving. As long as you do not let the pot boil dry, you are unlikely to overheat your wax.
## Why I Prefer the Direct Heat (And Why You Probably Shouldn’t)
Ok so here is a controversial opinion. I don’t use a double boiler anymore. I use a direct heat method with my silver pitcher, but I manage the heat very carefully. I set my electric stove to the lowest setting, and I never walk away from the room while the wax is melting. I stand there, watching it, stirring it slowly to help the solid chunks break down.
But here’s the thing, for a beginner, a double boiler is safer. A double boiler makes it nearly impossible to scorch your wax. It takes longer, yes, but the extra time is worth it. You can walk away for a minute to grab your gloves or wipe down another tin. With direct heat, you need to be locked in. If a phone call distracts you, you can ruin a whole pound of wax in less than two minutes. And the smell of burnt wax will linger in your kitchen for hours, no joke.
Whichever method you choose for your candlemaking tutorial part 1, just know that your pour pot is the star player. That smooth, polished silver cup is your workhorse. Treat it with respect, keep it clean, and it will last for hundreds of candles.
## The “Kitchen Scale” Nightmare (Measuring Your Wax by Volume)
One huge mistake that gets overlooked, especially in the first attempt, is measuring wax flakes by volume instead of by weight. You look at that silver pitcher and you think, “I’ll just fill this halfway and I’ll be good.” That is a terrible plan. Wax is airy. Flakes take up a lot of space. You need to be exact with your weight.
Buy a cheap digital kitchen scale. It costs less than fifteen dollars. Using a scale ensures that your wax-to-fragrance ratio is correct. This matters because if you want to make 15 gold tins, you need to know how much wax fits into each tin. If each tin holds four ounces by weight, you need roughly 60 ounces of wax, plus a little extra for wastage when you’re pouring.
– Weigh your empty tins first and write the number down.
– Fill them with water to measure the volume, then multiply by 0.86 to get the wax weight.
– Always melt a little extra wax than you think you need, about 10% more.
That last point is a lifesaver. There is no feeling quite as deflating as realizing you have 14.5 candles poured but one tin is sitting there empty, and your pour pot has a dried-up wax skin on the bottom. Melt extra. Thank me later.
## Why Your Fragrance Oil Is Betraying You (The Flash Point)
This is the part where a lot of tutorials wave their hands and say “just add the oil” without explaining the ugly details. Fragrance oils have a flash point. That is the temperature where the oil can potentially ignite. If you pour the oil into wax that is hotter than that flash point, you are not just losing the scent, you are creating a potential fire hazard.
So read the label on your fragrance oil. It will list the flash point, usually somewhere between 170°F and 200°F. The single most important habit I have adopted is checking this number before I even start melting the wax. Look, if you are in a rush and just wing it, you will probably be fine. But eventually you will get one crazy scent that doesn’t behave how you expect.
And do not just dump the oil in. Slowly pour the oil into the wax while you stir it. Mix for a solid minute, maybe two. The oil and the wax need to marry completely before you start filling those gorgeous gold tins. If you skip the mixing, your candle will have hot spots of pure fragrance oil that can cause pooling on the surface after the wax sets. That is a candle that will smell weird in the first two minutes and then nothing for the rest of its life.
## The Pouring Technique Nobody Talks About
Let’s talk about the actual action of pouring for a second. You have your melted and scented wax ready, your 15 gold tins are lined up, and your blue tile trivet is waiting to catch any drips. Now what? Do you fill each tin one by one? Or do you pour a little bit into each tin first?
I learned the hard way that you should not fill each tin to the top one at a time. Here’s why: the liquid in the pitcher loses heat as you go down. The last few tins will be cooler than your target pouring temperature, which can cause them to set with a different texture or not stick to the glass properly. The fix is simple. Go down the row and fill each tin halfway, then go back and top them off. This ensures that every tin gets wax that is roughly the same temperature.
And hold the pitcher high! Pour in a steady, thin stream. Low pouring is messy and creates splashes on the inside walls of the tin. That splashed wax leaves ugly tracks on the finished candle. Honestly, just take your time. Rushing this step is the reason your first batch looks nothing like the Pinterest photo that inspired you.
## Cleaning Up (The Dreaded Wax Mess)
Let’s talk about the part of the tutorial nobody wants to mention: the cleanup. When you are done pouring, your silver pitcher will have a layer of waxy residue on the inside. Never, ever scrape this out with a metal knife. You will scratch the smooth metal surface, and those scratches become little traps for future wax residue.
The proper way to clean a pour pot is to wipe it out while it is still warm, but not hot. If you miss that window, let it cool completely and then pop the pot in the freezer. The wax will shrink and crack, and you can just flex the pitcher and the puck of wax will fall right out. It is surprisingly satisfying. Then rinse with hot water and mild soap. Do not put it in the dishwasher, the harsh detergent will dull that beautiful polished finish.
So, there we have it. The supplies in that photo are doing a lot of heavy lifting. The 15 tins are the canvas, the silver pitcher is the brush, and the trivet is the safety net. My setup is basic because it needs to be. You do not need a dedicated craft room or expensive equipment. You just need heatproof materials, a bit of patience, and the willingness to learn from small mistakes. Save this guide for your first attempt. Then come back and tell me where you got stuck. I am genuinely curious. Getting your first batch right is a fantastic feeling, and I want you to have it.
This post was researched and drafted with AI assistance, then personally reviewed and edited by Diana before publishing.
Leave a Comment